Hi all,
In my blog I have explained how to user ASP.NET user control and wrap this onto SharePoint 2007 using WSPBuilder project.
It has 2 major shortcomings:
1) Apparently, its only for very simple web parts and we try to add more complex user controls and manipulate them, it will fail.
2) When you uninstall the solution, the web part will still host in "CONTROLTEMPLATES".
Its really bad practice and not all recommended.
It has 2 major shortcomings:
1) Apparently, its only for very simple web parts and we try to add more complex user controls and manipulate them, it will fail.
2) When you uninstall the solution, the web part will still host in "CONTROLTEMPLATES".
Its really bad practice and not all recommended.
There is more one technique and that technique which is not super easy to develop.
2) Developing SharePoint WebParts using User Controls and Web Applications (By: Greg Galipeau)
The first link is more easy to follow and just dumping the screen shots. We will discuss the demonstration in three parts:
Part A) Create WSPBuilder project
Part B) To add the ASP.NET templates
Part C) Creating the ASP.NET User Control
Part D) Wrapping the User Control and Connecting the Properties
Part A) Create WSPBuilder project:
----------------------------------------------------------------------------------------------------
Step1: Open up the Visual Studio >> File >> New >> Project >> In the Templates pane, click WSPBuilder Project. In the Name box, type MyWebPart, and then click OK.
Step2: Right-click the MyWebPart project, point to Add, and then click New Item. In the Categories pane, click WSPBuilder. In the Templates pane, click Web Part Feature. In the Name box, type MyWebPart, and then click OK.
Step3: In the Feature Settings dialog and enter the details:
>> Title: My Web Part
>> Description: A web part built using WSPBuilder
>> Scope: Web.
Click OK.
Step4: In the feature folder, open the elements.xml and web part properties as follows:
Part B) To add the ASP.NET templates
------------------------------------------------------------------------------------------------
Apparently, ASP.NET Project Types CAN NOT be embedded into WSPBuilder project. But there one way to enable those project types using following steps below:
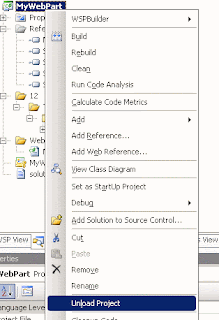
Step5: In Visual Studio, right-click on the MyWebPart project and select Unload Project
Step6: Right-click on the MyWebPart project again and select Edit MyWebPart.csproj. Locate the ProjectTypeGuids element and add the ASP.NET web application project type guid {349C5851-65DF-11DA-9384-00065B846F21}. The following code shows the corrected element:
Step7: Save and then close the MyWebPart.csproj file.
Step8: Right-click on the MyWebPart project and select Reload Project.
Step9: Right-click on the MyWebPart project and select Properties On the Application tab, change the Target Framework to be .NET Framework 3.5. Save the changes.
Part C) Creating the ASP.NET User Control
----------------------------------------------------------------------------------------
Step10: In Visual Studio, right-click the TEMPLATE folder, select Add then click New Folder. Name the folder CONTROLTEMPLATES.
Step11: Right-click the CONTROLTEMPLATES folder, select Add then click New Folder. Name the folder MyWebPart
Step12: Right-click the MyWebPart folder, select Add then click New Item.
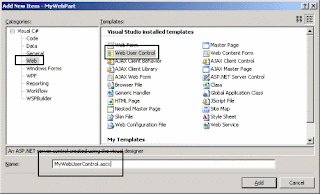
Step13: In the Categories pane, click Web. In the Templates pane, click Web User Control. Name the control MyWebUserControl.ascx, and then click Add.
Delete the CodeBehind attribute in the MyWebUserControl.ascx file. Replace the InheritsMyWebPart.MyWebUserControl, MyWebPart, Version=1.0.0.0, Culture=neutral, PublicKeyToken=[your PublicKeyToken]. attribute with
Note: Follow my blog to get the PublicKeyToken.
Step14: Open the MyWebUserControl.ascx file in the designer view. Click the Toolbox, and then add a Label using a drag-and-drop operation. Switch to the code view and rename the ID. MyLabel. property to be
Step15: Open the MyWebUserControl.ascx.cs file and the MyWebUserControl.ascx.designer.cs file. Change the namespace to MyWebPart in both files.
Step16: Open the MyWebUserControl.ascx.cs file. Add a public string property named DisplayText to the MyWebUserControl class. The following code demonstrates this:
public string DisplayText { get; set; } Step17: Add the following code to the Page_Load method. This will display
the value of the DisplayText property using the MyLabel control. protected void Page_Load(object sender, EventArgs e)
{
MyLabel.Text = DisplayText;
} Part D) Wrapping the User Control and Connecting the Properties
--------------------------------------------------------------------------------------------------------------------
Step18: Open the MyWebPart.cs file, Edit the attributes of the MyProperty property. The code below shows the changes:
[Personalizable(PersonalizationScope.Shared)]
[WebBrowsable(true)]
[System.ComponentModel.Category("Custom")]
[WebDisplayName("MyProperty")]
[WebDescription("Message to be displayed within Web Part")]
Step19: Within the CreateChildControls() method, delete the single line of code under the
// Your code here... comment. Enter code to load the MyWebUserControl, assign the value of MyProperty to the DisplayText property of the control and then add the control to the web part’s Controls collection. The code below demonstrates how to do this:// Your code here...
MyWebUserControl myControl =
(MyWebUserControl)Page.LoadControl("~/_controltemplates/MyWebPart/MyWebUserControl.ascx");
myControl.DisplayText = MyProperty;
this.Controls.Add(myControl);
Right-click on the MyWebPart solution and select Rebuild Solution.
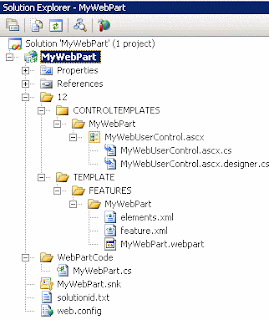
The project structure will look like this.
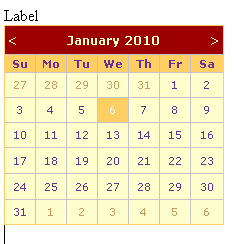
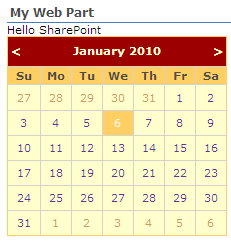
We can add one more calendar to the web part:
Step20: Build WSP, Deploy, Go to SharePoint site >> Site Actions >> Site Features >> Click on the Activate button next to the My Web Part feature.
Step21: Test the functionality.
Cheers,
--aaroh







No comments:
Post a Comment